

If you have access to technical personnel (software developers) and are looking to tightly integrate with our platform, then this Connector option is worth a look.
The REST Connector will automatically send form entry data in XML or JSON format to a web service address that you specify.
This allows you to integrate with us on an event level – i.e. whenever a new Form entry is received by us, you will receive the data on the nominal REST verb – e.g. POST.
Your web service should implement the API that we specify in order to understand the data we send by default.
Technical staff should see our Form Entries API documentation (found in the Integration section of our help site).
Alternatively, you can define your own custom request body to match into existing APIs endpoints that you wish to send form entry data to.
Adding the Connector
The Connectors page can be accessed from your Form design, settings or from the Screens listing if you mouse over the Form row in question.

Once you are in the Connectors page, setting up a REST Connector is easy:
1. Hover over the “Add Connector” button to see a list of the available Connectors.
Click the REST option.

2. This will refresh the page and display your Connector, ready for configuration.
Note that at this stage nothing has been saved – you must click the Save button to save your Connector after you’ve finished setting it up.
3. Specify the desired request format for example JSON or XML.

and the desired REST verb (usually POST)

4. If you are sending form entry data into an existing external service API, then you will need to customise the request body to match this.
Hit the “customise body” link to reveal a text area that you can use to define the request format, injecting your form fields using the same {{ }} syntax you would use to create a Data Template.
This opens up the ability to plug into almost any external service that exposes a REST API.
Simply read up on their API documentation about the required data structure and submission endpoints, then plug those into your REST connector url and body.

5. You need to specify the destination URL to which our platform will POST data.
You can either enter an address directly into the given field, or you can tick the “Use Global Forms REST URL” box.
The Global Forms REST URL option allows you to have a single global URL that can be reused for multiple Forms.
This option is configured in the Organisation Setup page (Menu -> Organisation Setup -> Advanced section).

6. At this stage, your Connector is ready to go.
Hit the Save button to save your changes and activate the Connector.
Customising the Request Body
The “customise body” option allows you to set up your own custom JSON or XML data payloads and inject form answer values using our standard {{fieldname}} syntax.
You can even cater for repeating data in your body by using our {{!REPEATSTART}} {{!REPEATEND}} syntax normally reserved for data templates.
For example, you might have a JSON body that repeats timesheet rows like so:
{
"timeEntries":
[
{{!REPEATSTART}}
{
"entryDate":"{{entryDate}}",
"startTime":""{{startTime}}",
"finishTime":""{{finishTime}}",
"timeTotal":{{timeTotal}},
"description":"{{entryDescription}}"
},
{{!REPEATEND}}
],
"entryCount":{{hiddenEntryCount}},
"headerSummary":"{{headerSummary}}",
"entrySummary":"{{entrySummary}}"
}
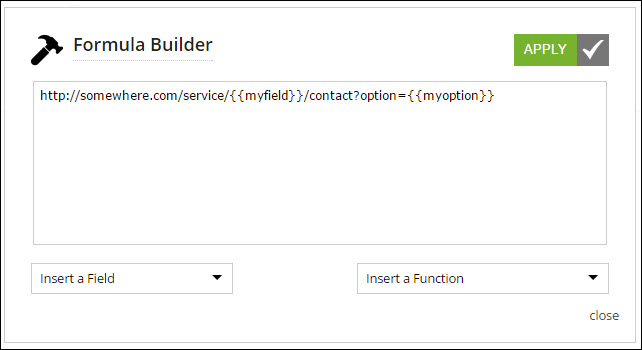
Setting up a Dynamic Request URL
You can also inject answer values to dynamically build up the url that the request will be sent to.
So for example your target url could look like:
http://somewhere.com/service/{{myfield}}/contact?option={{myoption}}
Click on the hammer next to the Desination URL box.
Adding Custom HTTP Headers
Use the “customise headers” option to add HTTP request headers onto the REST request that is sent out by the platform.
This is useful for external API services that require you to authenticate using Auth headers that contain your username/password combinations.
Header values can be dynamic as well – you can inject form field values using the usual {{myfieldname}} syntax.
NOTE: HTTP Headers are NOT a way to send your form field names to the target API.
Research HTTP Headers to understand what these are and how to use them.

Add a Run Condition
Sometimes you may have a Connector that you only want to fire in the event that the Form entry has a given answer value.
For example you may have an Audit Form, which has a risk rating question with options like “Low”, “Medium” and “High”.
If the user answers the risk rating as “High”, then you want an email to be sent to a supervisor for followup and action.
This is where a Run Condition comes in.
Run Conditions are defined by creating a true/false formula.
The Connector will only run if the formula you define in the Run Condition has a true result.
So in the example above, the Run Condition formula would be something like:
{{riskRating}} = ‘High’
When you hover over the Run Condition field, you will see a hammer icon appear.
Clicking the hammer will take you into the Formula Builder, which helps you to put together the formula you desire.
See the Creating a Forumula page to learn more about form formulae.

Troubleshooting
Timeouts on your REST connector jobs
You may encounter situations where timeout errors are reported for your REST connector when it runs on a Form entry.
This will be because your REST web service is not responding with a 200 OK status within 20 seconds of our platform sending the REST request.
The 20 second timeout applies purely to the time taken to execute the REST request, deliver the data, and get a response back.
Any PDF file that is sent as part of the request will be first generated prior to commencing the request timeout clock.
Note that we don’t send any actual media files captured in a Form entry with REST requests, instead, we send the file names so you can retrieve the files separately via our API.
Thus the only images sent with a REST connector request would be those within a generated PDF file.
Our data center has gigabit connections and transmits very fast. Obviously, your servers should have similarly fast transport links.
If we raised the timeout, the issue for us is that this can create very large backlogs on our connector job queues when the target REST web services have an issue and do not respond. In that scenario, our connector process will sit waiting for the full timeout period hoping for a response. That would be 20, 30, 40 etc seconds that a connector process is doing nothing, when it could be processing the next job.
When this happens at scale (i.e. with thousands of connector jobs) then this can create big backlogs on our connector infrastructure.
At this point, we have no plans to increase the timeout beyond 20 seconds.
If you are regularly hitting the timeout limit, then we recommend you examine your web service and make changes to process incoming requests faster.
A simple way to do this is to simply store the incoming request on a queue/database and respond with a 200 OK immediately.
Then do any time-consuming processing (e.g. database inserts) asynchronously by having a separate process pick up the incomings from the queue/database.